

Same space, new reality! I recently created a prototype for a small escape from the reality of home isolation during the ongoing COVID-19 pandemic. After sharing a video of it on twitter, I’ve received a lot of questions about it and requests for a tutorial, so I created this guide show how it was made and how it can be recreated.
[UPDATE] If you would like to follow along with a video tutorial instead, someone posted a great video about it on youtube: Link
We will be using Unity and an Oculus Quest. The finished project files can be found here. I will start with the condensed version below, which might be enough for the more experienced developers to implement in their own way:
- Make an Oculus Quest app using Unity that allows you to place small cubes when a button on the Quest controller is pressed
- Go around your space and trace around around walls and furniture by placing lots of these cubes to form a map of your space
- Figure out a way to send this map to the Unity editor and save it (or use my method described below)
- Bring in and edit your 3D models to fit the map you just created
- Build another app with your new 3D models and environment
- For alignment, you can either always start the app in the same physical location so that the two worlds align, or implement a calibration method based using a fixed marker position and the position of one of the controllers
Prerequisites
If you’re following this tutorial, I assume you already know:
- How to install Unity and all the Android Tools
- How to put your Quest in developer mode
- How to develop a basic Unity application for the Quest
If that’s not the case, you can follow this tutorial by Tony @TheGhostHowls that covers all the above topics. When you finish it, you can come back to this one.
Setup
Create a new 3D project and and import the Oculus Integration from the Asset Store. Go to the asset store window and search for it or get them from here.
The second thing we will need is a networking framework that will allow us to send data wirelessly from the Quest to the Unity Editor over the local wifi. We will use a plugin called Unity OSC. Download the script from here and import it into your unity project. Your project should now look like something like this:

Mapping your space
Now that we have the necessary plugins, create a new scene, name it ‘Mapping’ and drag the OVRCameraRig prefab from the Oculus folder into the scene. Set ‘Tracking Origin Type’ to ‘floor’.

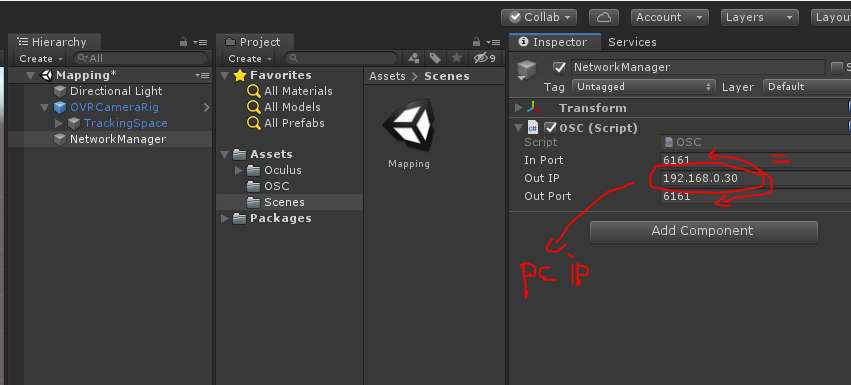
Create a new object into the scene and name it ‘Network Manager’. Drag the OSC script onto this new object. Fill in your computer’s IP address in the IP field of the OSC.cs script. On windows you find your IP by opening the command prompt and typing ‘ip config’. Then change the incoming port to be the same as the out port as seen in the image below.
Now we are going to create a script, name it ‘PointPlacer‘ and add it to the RightHandAnchor under the OVRCameraRig object. This script will serve the following functions:
- Instantiate a cube when button B on the right controller is pressed
- Send a message over the wifi to the Unity Editor using OSC to say that a new cube was created along with its position
using System.Collections;
using System.Collections.Generic;
using UnityEngine;

public class PointPlacer : MonoBehaviour
{
    OSC osc; //reference to the osc script that will send the network messages

    void Start()
    {
        osc = (OSC)FindObjectOfType(typeof(OSC)); //get the OSC script instance in the scene
    }

    void Update()
    {
        if (OVRInput.GetDown(OVRInput.Button.Two)) //detect is button 'B' has been pressed
        {
            GameObject cube = GameObject.CreatePrimitive(PrimitiveType.Cube); //create a cube
            cube.transform.localScale = new Vector3(0.05f, 0.05f, 0.05f); //scale it down
            cube.transform.position = this.transform.position; //move it to the position of our controller

            OscMessage message = new OscMessage(); //create a new message
            message.address = "/newPoint"; //set the message
            message.values.Add(cube.transform.position.x); //add x position
            message.values.Add(cube.transform.position.y); //add y position
            message.values.Add(cube.transform.position.z); //add z position
            osc.Send(message); //send the message
        }
    }
}
We will then need another script that will receive the network messages and recreate each cube received in the Unity Editor. Name this script ‘PointReceiver‘ and add it to any object in the scene.
using System.Collections;
using System.Collections.Generic;
using UnityEngine;

public class PointReceiver : MonoBehaviour
{
    OSC osc;        //reference to the osc script that will receive the network messages
    Transform map;  //a holder for the points

    void Start()
    {
        osc = (OSC)FindObjectOfType(typeof(OSC)); //get the OSC script instance in the scene
        osc.SetAddressHandler("/newPoint", OnReceivePoint); //set it to listen to messages with our address

        if (GameObject.Find("Map") == null) //if there's no 'Map' object in the scene
            map = new GameObject().transform; //then create one

        map.gameObject.name = "Generated Map"; //rename it
    }

    void OnReceivePoint(OscMessage message)
    {
        print("received point");
        float x = message.GetFloat(0);
        float y = message.GetFloat(1);
        float z = message.GetFloat(2);

        GameObject cube = GameObject.CreatePrimitive(PrimitiveType.Cube); //create a cuve
        cube.transform.localScale = new Vector3(0.1f, 0.1f, 0.1f); //scale it down
        cube.transform.position = new Vector3(x, y, z); //place it at the position received
        cube.transform.parent = map; //parent it to the 'Generated Map' object
    }
}
We are now ready to build the app to the headset and generate our map. Set your project Build Settings to ‘Android’, the minimum target SDK to19, and the VR SDK to Oculus as explained in the Quest setup tutorial I linked to earlier. Once the app is built to the headset and running, click play in the editor as well.
Now when you press button B on your Quest controller, you should see cubes appear in the Unity Editor as well. If they don’t, there are a few things to check and try:
- Check that your Quest and computer are both connected to the same wifi network
- Disable windows firewall/any other firewall. Network firewalls will sometimes block this kinds of connections
- Check that the IP in the OSC script is correct, and that the network message is identical in both the sending and receiving script
If you’ve tried all of the above suggeations and and still not receiving any data, you can try to come up for an alternative to get the data into the editor. One could be using a link cable and a VR capable laptop which you carry around as you place the points or you can saving the positions of each cube to a text file, save it locally and use it on your computer to read from and recreated the cubes.
Assuming the cubes are coming through, go around your space and place cubes everywhere you see fit. I first went around the walls and placed points along each wall, then moved onto doors and other features like furniture. The more points, the merrier!

Once you are happy with you map, drag the ‘GeneratedMap’ object that was just created into the Project files to turn it into a prefab and save it for later use. You can now quit play mode and quit the app on the headset.
Fitting the 3D models to the map
We are nearly there! Drag the prefab we just created back into the scene. Now that we have a real life map of our space, we can place and edit our 3D models to fit the map. In the original video I shared I used a virtual treehouse I found on sketchfab, you can get it from here (note that you will have to edit the models into a separete 3D modelling software).

After we are happy with the placement of our 3D models, we can now build the app again to the headset. Assuming we always start the app in the same physical location and orientation, the virtual space should align fairly well with your real space.
Optional calibration functionality

If we want more accuracy/ease of use with the alignment, we need to add a calibration step. The way we’re going to do this by choosing a refference point at a known location (such as a specific corner your space, or a printed marker) which we can use a reference to align the two worlds.
A printed/drawn marker with the shape of a Quest controller would give the most precise calibration, however for the purpose of this tutorial I am just going to use the corner of my desk. Bring two 3D models of the right controller from the Oculus folder. Place one controller at your chosen calibration point and parent the other one to the RightHandAnchor.
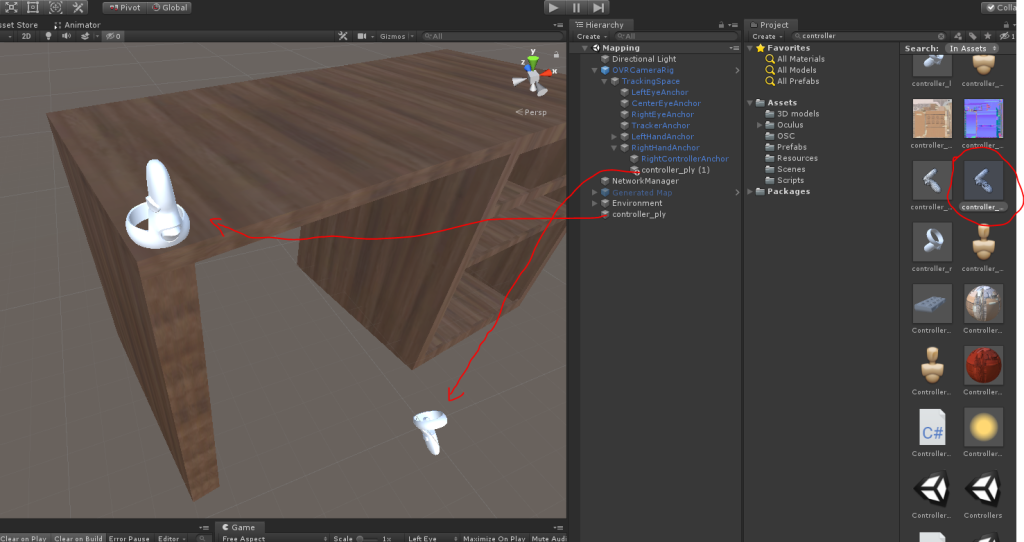
Create a new script and call it ‘Calibration’. Add the code below, and add this script to the CameraRig. Then, assign the two public refferences controller on our RighHandAnchor and the controller on the desk/chosen location (named handMarker & fixedMarker in the script below), and will offset the position and rotation of the CameraRig to realign the two controllers.
using System.Collections;
using System.Collections.Generic;
using UnityEngine;

public class Calibration : MonoBehaviour
{
    public Transform handMarker;  //the controller on the hand
    public Transform fixedMarker; //the fixed controller

    void Update()
    {
        if (OVRInput.GetDown(OVRInput.Button.One)) //detect is button 'A' has been pressed
        {
            Vector3 posOffset = fixedMarker.position - handMarker.position; //calculate the difference in positions
            this.transform.position += posOffset; //offset the position of the cameraRig to realign the controllers

            Vector3 rotOffset = fixedMarker.eulerAngles - handMarker.eulerAngles; //calculate the difference in rotations
            transform.RotateAround(handMarker.position, Vector3.up, rotOffset.y); //using the hand as a pivot, rotate around Y
        }
    }
}
Build the app again. Align your controller to the calibration point (in my case I am going to place my controller on the corner of the desk), press the A button on the controller and the virtual world should snap into place.
Congratulations! You now have a virtual replica of your home complete with the ability to calibrate the alignment whenever needed!

This worked flawlessly!! I am on a PC so had to turn off Defender firewall. After doing a quick test and not doing the calibration I can see why this important.I quickly mapped out a few rooms, added prefab doors and walls and when I rebuilt my scene I was sitting in a slightly different location and everything was off a little. I will work with this more on the weekend and post my findings. Thank you very much for getting this tutorial up fast!!!
LikeLike
Awesome, good to hear it’s working well!
LikeLike
Could you please do a video reviewing how to do this. It would be very nice.
LikeLike
Will try to get this done soon
LikeLike
For the Calibration when you say ” assign the two public references to each of the controllers.” what do you mean? I created a script named “fixedMarker” and dropped it on the controller_py that I dragged to on the table in my scene to mark the position. Then I created a script called “handMarker” and dropped it on the controller_ply under the RightHandAmchor.
LikeLike
You only need to create one script called ‘Calibration’ and add the code I provided. Once you add this script to the CameraRig object, two public fields in the inspector will show up (handMarker and fixedMarker). You need to drag each the respective controller_py to these fields.
LikeLike
Thank you for the clarification. I think I copied the code wrong the first time and never had the public variables available in the inspector.
Once I got it to work I could never get the controller to align. Usually the handMarker appears above the fixedMarker by 6-8 inches. Any suggestions?
I also suggest adding the lefthand controller similar to the handMarker to mark the other side of an object like the other side of the desk in your example. This helps with the rotation of the handMarker to get the desk top aligned.
LikeLike
Hey, very awesome Job. Trying to copy you but I am not able to see the OVRCameraRig prefab from the Oculus folder, I only see OVR Plugin.
Do you know what’s happening?
LikeLike
Thanks! Hmm just search for it in the project search bar. You can find more info here: https://developer.oculus.com/documentation/unity/unity-utilities-overview/
LikeLike
Thanks for the tutorial, love it.
After some trials I finally got working the Apk on the Quest but I am not receiving the dots on the Unity Editor. Tried your tips without working less the network message on both scrips sending and receiving as I dont know how to check it.
I added the receiver scrip to the NetworkManager. Was it OK?
Is there a way to storage all the cubes and the scene on the Quest and imported to the Unity editor after?
Thanks
LikeLike
Thank you! The receiver script can be on ony object, yes. If you manage to build the quest app with the IP address of your computer, try getting the project from my github and see if that works. Maybe you did something wrong in the project setup.
You could save all the points to a text file instead and copy that text file over – but that would require some changes to the script
LikeLike
Emanuel:
Once I got it to work I could never get the controller to align. Usually the handMarker appears above the fixedMarker by 6-8 inches. Any suggestions?
I also suggest adding the lefthand controller similar to the handMarker to mark the other side of an object like the other side of the desk in your example. This helps with the rotation of the handMarker to get the desk top aligned.
LikeLike
When i build to quest and then try to play it always crashes unity
LikeLike
Ah that’s annoying. Hmm the networking script has caused crashes for me before, but it’s quite uncommon. Have a look at the crash logs and see if that says anything. Might be worth trying another Unity version as well
LikeLike
Just Thank you. I appreciate your tutorial.
LikeLiked by 1 person
hey i tried this and it all worked untill i went to place blocks in vr. they did not appear in unity. unity did create a generated map but nothing appeared on it and it just stayed as nothing. any idea how i can fix this cause i think this is pretty cool.
LikeLike
It must be that the peer to peer connection didn’t work at all. Check that both the headset and computer are on the same network, disable any firewall or try another wifi
LikeLike
Hi, once I create the Point Rec’r and try to add it I get a “Cant Add Script” message. Any common reason this would pop up?
LikeLike
Likely there’s something wrong with the script. You can’t have spaces in the name of it, and make sure there are no errors in the code
LikeLike